How to Budget a Part Time Employee
When budgeting part-time employees there are few important tips you should know.
Tip 1: Employees with a part time appointment will pull into the KC Budget Module with their annualized salary in the Base Salary field. For example, if Mr. Spartan was a 75% employee with a salary of 45,000 per year, the annualized amount that would pull in for his Base Salary in KC would be $60,000 (i.e. $45,000/.75 = $60,000). 
Tip 2: It is important to select the correct object code for the part-time employee. The object code is what drives the calculation of fringe benefits, so in order for the fringe rate to calculate correctly, the appropriate object code must be selected. Use the following chart to help select the correct object code for a part-time employee.
| Employment % |
Object Code |
| Full-time (90% or greater) |
Any full SI object code (e.g. Faculty Salaries & Wages or Staff Salaries & Wages) |
| 75% time (75% - 89%) |
Part-Time Employee (3/4) |
| 50% time (50% - 74%) |
Part-Time Employee (1/2) |
| Less than 50% time |
Part-Time Employee (1/4) |
Below are some scenarios on how to budget part-time employees. NOTE: For demonstration purposes, inflation has been turned off.
Scenario 1
Continuing with the example from Tip 1 above, Mr. Spartan will be working all of his part-time appointment on this project, or the full 75%.
- Leave the Base Salary field at the annualized amount of Mr. Spartan’s salary ($60,000)
- Select Mr. Spartan from the Person dropdown list in the Person Details panel and select the Part-Time Employee (3/4) Object Code. Click add.

- Enter 75 in the % Effort and % Charged fields and click calculate. The requested salary will calculate the amount of the 75% appointment. The calculated fringe will account for the 75% employee, and adjust the SI health component accordingly.

Scenario 2
Mr. Spartan will be working half of his part-time appointment on this project, or 37.5% (i.e. 75% * 50% = 37.5%)
- Follow steps 1 and 2 from Scenario 1
- Enter 37.5% in the % Effort and % Charged fields and click calculate. The Requested Salary will calculate half the amount of his 75% salary. The Calculated Fringe will account for the 75% employee, and adjust the SI health component accordingly.

Scenario 3
Ms. Green, a 40% employee, will be working 100% on the project. Her salary is $32,000
- Leave Ms. Green’s Base Salary field at the annualized amount that is pulled in from SAP, or $80,000 (i.e. $32,000/.4 = $80,000)

- Select Ms. Green from the Person dropdown list in the Person Details panel and select the Part-Time Employee (1/4) Object Code. Click add.
NOTE: A part time employee that has less than a 50% appointment, should always use the (1/4) time object code in order for the fringe benefits to correctly calculate with FICA tax only. 
- Enter 40% in the % Effort and % Charged fields and click calculate. The Requested Salary will calculate the amount of the 40% appointment. The Calculated Fringe will only calculate FICA, due to Ms. Green’s employment percentage being less than 50%.

How to Budget Subcontracts
When building a detailed budget in KC there are three typical scenarios for how to include subcontracts:
- Scenario 1: System to System (S2S) detailed budget
- Scenario 2: NIH Modular budget (when MSU is the prime agency)
- Scenario 3: All other subawards
Scenario 1 – S2S Detailed Budget
When submitting a S2S proposal with a detailed budget that includes subcontracts, the majority of solicitations also require the subcontracts to include a detailed budget. Take the following steps:
- Navigate to the S2S tab, Forms panel and find the version of the subaward budget form that is required for the application. In the example below, RR_SubawardBudget30_1_3, is the required version.
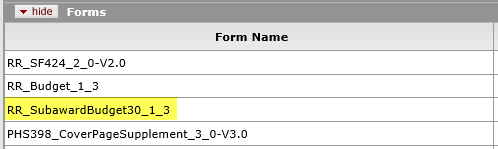
- If RR_SubawardBudget30_1_3 is the version required, you can locate the form template on SPA’s User Attached Forms webpage. Other versions can be found on the Grants.gov Forms webpage. The subaward budget template must be completed for each subaward on the proposal.
- The completed subaward budget templates are attached on the Budget Actions tab, within the KC Budget Document for the proposal. On the Subaward Budget panel, click the search icon to select the subaward organization. Click the Browse button to search and select the completed subaward budget template for the organization. Click add.

- Once the subaward budget template has been added, click show on the Attachment Details and Details subpanels to view information that pulls in from the attached subaward budget template. If information is not displayed, check the version of the subaward budget template to make sure it is the correct version for the application.
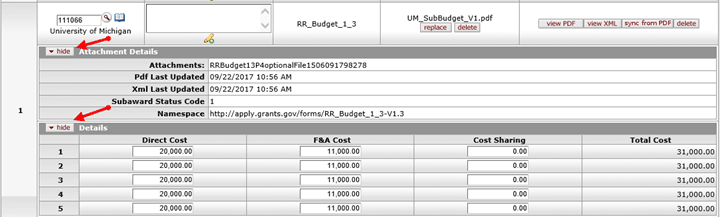
- The subaward expenses are automatically added as object codes on the Non-Personnel tab when the budget is attached, therefore you do not need to add the subaward expenses to MSU’s detailed budget.
- On the S2S tab, Forms panel, click the box in the Include column for the subaward budget form.

Scenario 2 – NIH Modular Budget with subawards
In order for the system to calculate a modular budget and exclude the subaward F&A costs from the module amount, we have to tell the system which portion of the subaward budget is for F&A. We also have to tell the system the portion of the subaward costs that are under and over the $25,000 threshhold. We tell the system this information through the use of object codes:
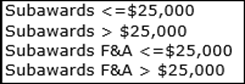
- Start with the Subawards <=$25,000 object code for the direct costs. Only budget using this object code up to the $25,000 threshhold. If the direct costs are over the threshhold, budget the remaining direct costs using the Subawards > $25,000 object code. In this example, because the direct costs crossed the $25k threshhold, the F&A costs would also be considered above the threshhold, and would use the Subawards F&A > $25,000 object code.
- If the direct costs are under the $25,000 threshhold, budget the F&A costs using the Subawards F&A <=$25,000 object code for the amount of subaward F&A costs that are under the $25k threshhold. Any remaining F&A costs above the $25k threshhold should be budgeted using the Subawards F&A > $25,000 object code.
Let’s look at a few examples.
Example 1: The Direct and F&A Costs do not surpass the $25,000 threshhold in year one
Year 1 object codes would be as follows: 
Notice both of the object codes are <= $25,000, however one is for direct costs and the other is for F&A costs.
Year 2 object codes would be as follows: 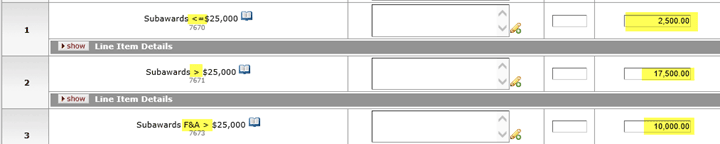
The remaining direct costs that were within the $25k threshhold (i.e. 2,500) are budgeted in the object code for direct costs <= 25k; the remaining direct costs are budgeted in the object code for direct costs that are over $25k ($20,000-2,500 = 17,500); and the F&A costs are budgeted in the F&A object code that is over the $25k threshhold.
Year 3 object codes would be as follows: 
Now that we have exceeded the $25k threshhold, the only object codes that are necessary are the object code for the direct costs over $25k and the object code for F&A over $25k.
Years 4 and 5 object codes would be budgeted using the same methodology as year 3.
Example 2: The Direct and F&A Costs surpass the $25,000 threshhold in year 1
Year 1 object codes would be as follows: 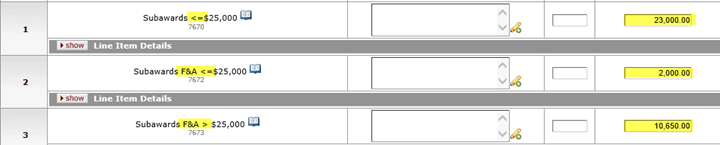
The first $23k in direct costs are budgeted with the object code for direct costs that are <= $25k; the remaining $2,000 within the $25k threshhold are budgeted with the subaward F&A <= object code (i.e. 25,000-23,000); the balance in F&A is budgeted with the F&A > $25k object code (i.e. 12,650 – 2,000 = 10,650).
Year 2 object codes would be as follows:
Now that we have exceeded the $25k threshhold, the only object codes that are necessary are the object code for the direct costs over $25k and the object code for F&A over $25k.
Scenario 3 – All other subawards
For all other subaward scenarios there are only two object codes that are used. They are: 
These object codes tell the system, which portion of the subaward is less than the $25k threshold and which portion is over. Let’s look at an example.
Example:
Year 1 object codes would be as follows: 
The first $25k is budgeted with the object code that is <= $25,000, and the remaining subaward balance is budgeted with the object code > 25,000 (i.e. 155,000-25,000 = 130,000).
Year 2 object code would be as follows: 
Because the subaward crossed the $25,000 threshhold in year one, the full amount of year two is budgeted with the object code that is > $25,000.
How Is Inflation Calculated
When KC calculates Requested Salary Amounts in each Budget Period, it uses information defined by the user as well as system parameters to calculate inflation. KC uses:
- Base Salary – For named employees this field pulls from SAP, for TBN employees this field is entered by the user
- Salary Effective Date – Defaults to the date the budget is created, however can be edited by the user
- Budget Period Start Date – Dates default to 12 month periods based on the start date identified in the proposal document, however the periods may be edited by the user on the Parameters tab
- Budget Period End Date – Behaves the same as the Budget Period Start Date
- Apply Inflation Checkbox – In the line item details subpanel for each object code and/or group a user can uncheck the inflation checkbox to avoid inflation from being calculated on expenses within that object code, for that group.
- Research Inflation Applicable Rate – On the Rates option, Research Inflation tab, a user can edit the inflation rate that is automatically applied by the system when calculating requested salary amounts, as well as when generating all periods. The system defaults to 3%.
- Inflation Start Date – This is a system parameter that has been set by MSU to calculate inflation for personnel expenses on 10/1. This cannot be edited by users.
Let’s look at a few examples (all examples are based on 100% Effort and 100% Charged):
Example 1: A budget is created on 8/22/17 for a project that will start on 9/1/17. On the budget create date, the base salary for the employee is $100,000 and they are on a 12 month appointment. The inflation rate was left at the system default of 3% and the Apply Inflation checkbox is checked in all budget periods.
- For the first month of the budget period (9/1/17-9/30/17), the salary is calculated using the base salary of $100,000, which calculates the month salary as $8,333 (i.e. $100,000/12 month appt. *1 month).
- On 10/1/2017, inflation will kick in and KC will begin calculating with a base salary of $103,000 (i.e. $100,000*1.03) for the remaining eleven months of the budget period (10/1/17-8/31/18), which calculates to $94,417 (i.e. $103,000/12 month appt. * 11 months)
- For the two pieces that make up the budget period, KC takes the first month of the budget period plus the remaining eleven months to calculate a Requested Salary for Period #1 of $102,750 (i.e. $8,333 + $94,417).
As you can see, KC doesn’t calculate a full 3% inflation for the first budget period because of when the salary inflation date falls in the overall timeline of the budget period. 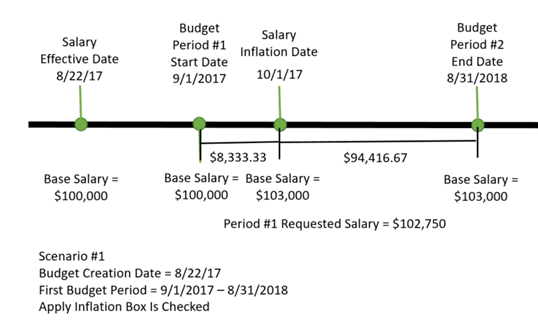
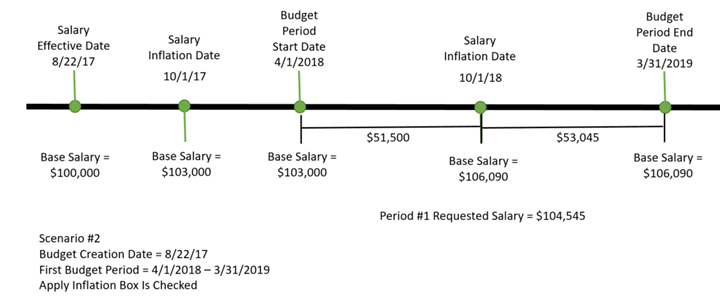
Example 2: A budget is created on 8/22/17 for a project that will start on 4/1/18. On the budget create date, the base salary for the employee is $100,000 and they are on a 12 month appointment. The inflation rate was left at the system default of 3% and the Apply Inflation checkbox is checked in all budget periods.
- On 10/1/2017, the system will calculate 3% inflation on the base salary, making the base salary $103,000 (i.e. $100,000 * 1.03).
- On 4/1/2018, when the budget period starts, the salary is calculated using the base salary of $103,000, and will continue to use this base salary for the next 6 months (through 9/30/18) before the next increment of inflation will be included. Salary for the period 4/1/18-9/30/18 calculates to $51,500 (i.e. $103,000/12 month appt. *6 months).
- On 10/1/2018, inflation will kick in again and KC will begin calculating with a base salary of $106,090 (i.e. $103,000 * 1.03), and will use this base salary for the remaining six months of the budget period (10/1/18-3/31/19), which calculates to $53,045 (i.e. $106,090/12 month appt. * 6 months)
- For the two pieces that make up the budget period, KC takes the first six months of the budget period plus the remaining six months to calculate a Requested Salary for Period #1 of $104,545 (i.e. $51,500 + $53,045).
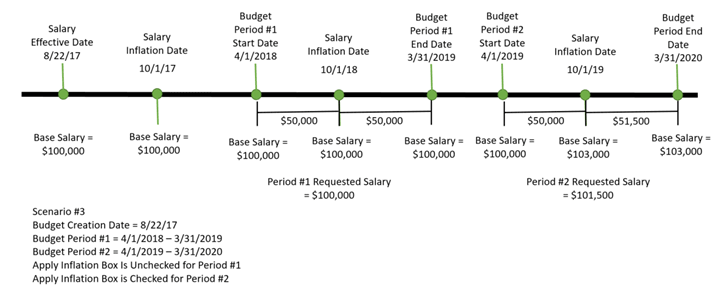
Example 3: – A budget is created on 8/22/17 for a project that will start on 4/1/18. On the budget create date, the base salary for the employee is $100,000 and they are on a 12 month appointment. The inflation rate was left at the system default of 3%, however in this example the Apply Inflation checkbox is unchecked in budget period one and checked in budget period 2.
- On 10/1/2017, the system will not calculate 3% inflation on the base salary because the Apply Inflation checkbox is unchecked, which keeps the base salary at $100,000.
- On 4/1/2018, when the budget period starts, the salary is calculated using the base salary of $100,000, and will continue to use this base salary throughout the first year budget period. When 10/1/18 is passed in budget period one, the system will once again forego the 3% inflation factor because the Apply Inflation checkbox is unchecked for period one. Salary for the period 4/1/18-3/31/19 calculates to $100,000. Inflation has not been applied.
- When budget period 2 starts on 4/1/2019, the system is still calculating based on the $100,000 base salary, because we have not passed the next 10/1 inflation period yet. For the next six months (4/1/19-9/30/19), the base salary will calculate to $50,000 (i.e. $100,000/12 month appt. * 6 months).
- On 10/1/2019, inflation will kick in again because the Apply Inflation checkbox is checked in year two, and KC will begin calculating with a base salary of $103,000 (i.e. $100,000 * 1.03), and will use this base salary for the remaining six months of the budget period (10/1/19-3/31/20), which calculates to $51,500 (i.e. $103,000/12 month appt. * 6 months)
- For the two portions of the year that make up budget period 2, KC takes the first six months of the budget period plus the remaining six months to calculate a Requested Salary for Period #2 of $101,500 (i.e. $50,000 + $51,500).
Throughout all of these scenarios KC is looking at the information entered by the user, and using system parameters defined by MSU, to calculate Inflation. Users can manipulate how KC will calculate inflation by:
- Changing the Salary Effective Date - the Base Salary will become effective on that day. In Example #2, if the user had changed the Salary Effective Date from 8/22/17 to 4/1/2018, KC would not have added inflation on 10/1/17 because the salary wasn’t effective yet. Therefore, the base salary on 4/1/18 would have remained at $100,000 until the next next 10/1 inflation increment hit.
- Unchecking the Apply Inflation checkbox – this can be done in any budget period. This checkbox applies to all positions/persons that have been budgeted within the same object code. If you only want to uncheck/check inflation for one position/person within an object code, you should use the Group feature. See instructions for the Group feature within this Update.
- Changing the Research Inflation Applicable Rate – system default is 3%, but can be changed by the user.
Using the Group Feature for Personnel
When budgeting personnel, KC combines all of the Persons that are budgeted under the same object code together in one group. This group shares the options in the Line Item Details and Rates subpanels for that object code. This can be problematic in situations where you want to treat someone differently than the others in the same object code. For example, if you were budgeting two graduate students, however you only wanted to include inflation on the stipend rate for one of the grads. The Group feature allows you to create separate groups for an object code, where you can elect different options in the Details and Rates subpanels.
A Group is added when adding a person to the budget. After selecting the Person and Object Code Name, type in a name for the group in the text field in the Group column. Click add. Once the group has been added, it will populate in the Group dropdown list so it can be selected for others who may also apply to the group. 
As you can see from the below screenshot, the box in red, shows the grad student that was added using the No Inflation Group. The box in blue, shows the person that was added using the Graduate Student object code without using the group. The names are highlighted in yellow to show that when using the Group feature the name of the group is provided after the object code name. You can also see that different selections can be made in the Details subpanel for the different groups. 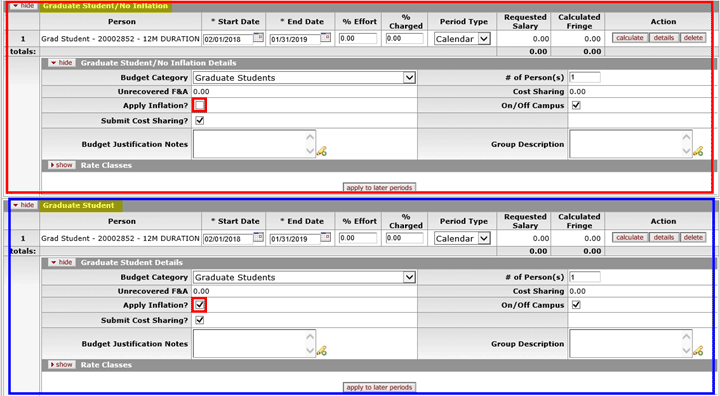
How to Budget Faculty Who Are over the NIH Salary Cap
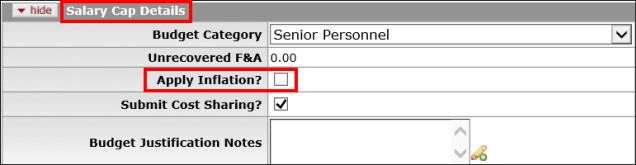
If you have faculty who are over the NIH Salary Cap and you are building a budget where you need to include their salary at the capped rate rather than their regular rate, take the following steps:
- Edit the base salary to be at the capped amount for their appointment type (e.g. $187,000 for 12 month appointment; $140,250 for 9 month appointment; $46,750 for Summer appointment)

- Add the faculty member to the budget in the Person Details panel using the Salary Cap object code.

- Once added, click show next to the Salary Cap Details subpanel. Within the details subpanel uncheck the Apply Inflation? checkbox.
Now when you select the option to Generate All Periods, the salary will stay at the salary cap level rather than inflating in the outer years.

