Last Updated: 2/2/2016
This document walks you through the steps for navigating within the Kuali Coeus application.
WHO:
All Users
WHEN:
This quick guide is useful when you want to perform common functions within the application
HOW:
Logging in to Kuali Coeus
- Click on the link to access the Kuali Coeus application: https://kc.researchadmin.msu.edu/kcprd/portal.do
- Enter your MSU Login, Password, and authentication code. For more information on MSU’s Two-Factor Authentication, please visit: https://secureit.msu.edu/two-factor/
Once logged in, the system displays the KC Main Menu with the Researcher Tab displayed:

KC Main Menu
As shown above, the Main Menu has 5 tabs, each designed for a specific user or function:
- Researcher: Designed primarily for faculty and those who assist faculty in performing functions such as creating and modifying proposals, completing conflict of interest disclosures and certifications, and viewing associated negotiation and award information.
- Unit: Designed for research administrators at the college and/or department level. Unit users of KC may coordinate the completion of a proposal, review an award document or complete items such as budget modifications or report tracking. Due to the nature of the research administrator’s role, this menu has search and routing capabilities not found under the Researcher Tab.
- Central Administration: Designed for Central Research Administration offices. The Central Administration Tab offers functions organized in a manner similar to the Unit Tab but provides access to functions only performed by Central Administration. The Central Administration Tab includes function such as document routing, approval, submission, logging negotiation activities, award creation and committee management.
- Maintenance: Designed for individuals who need to maintain information that is referenced by e-Docs within the Kuali Coeus application (i.e. information contained in drop-down menus). Any user who has access to the Kuali Coeus application can view information on the Maintenance Tab. The ability to modify information under the Maintenance Tab, however, is typically granted only to those responsible for supporting the application.
- System Administration: Designed for individuals who maintain information and administrative functions such as parameters within the Kuali Coeus application. Any user who has access to the Kuali Coeus application may view information on the System Administration Tab. The ability to modify information, however, is given only to those responsible for supporting the application.
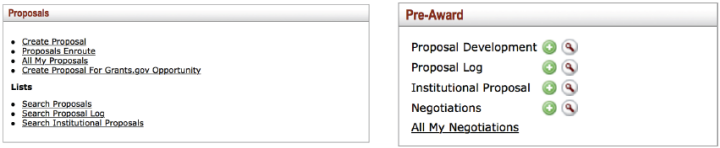
The section under each header is referred to as a Channel. Each Channel contains functions within a given topic. The topics vary depending on what tab has been chosen. For example, the Researcher Tab has Proposal and Awards Channels, but the Unit and Central Admin Tabs have Channels, which include broader Pre-Award and Post-Award functions. An individual can search for proposals under each menu, but each is designed for the specific audience interacting with the application.
The Proposals and Pre-award Channels as displayed on the Researcher and Unit Tabs respectively:
Common Icons
Common Features
- The Asterisk* indicates a required field that must be completed to advance the document or add a row of information. Some of these fields must be completed before allowing the user to advance to additional screens, others can be completed in any order but must be completed before finalizing the specific document
- Moving from one tab to another will activate the automatic save feature. The system does not perform the automatic save feature when users move within a tab. For example, changing budget periods or versions within a tab does not auto save changes. It is therefore important that users click “save” when moving between budget periods and/or budget versions.
- The Data Validation panel appears in many modules of the KC application and can be found on an “Actions” tab (e.g. Proposal Actions, Budget Actions, Disclosure Actions, Award Actions, etc.). The user is able to turn the Data Validation feature on or off as desired. When turned on, the Data Validation feature will display errors and warnings with a fix button. If a fix button is clicked the user will be taken directly to the portion of the document where the error or warning is noted. If no errors or warnings are found, a note will display indicating, No Validation Error or Warning is present. Note that data validation will automatically engage when the user submits the document for institutional approval.
- Medusa is a tab found in multiple e-Docs. The Medusa Tab functions as a relational cross reference allowing for quick identification of documents forming a collective body of work. The Medusa Tab also functions as a tool for easy navigation to all related e-Docs such as Proposal Development, Institutional Proposal, Negotiations, Award and Subawards
Common Document Actions
| Action Button |
Description |
 |
The add button allows the user to add a collection of information that is related and grouped together in the application.
|
 |
The delete button removes a given row from a tabled list, thereby removing the information from the document.
|
 / /  |
The show/hide button allows the user to open or close individual panels for display and data entry.
|
 / /  |
The expand all/collapse all buttons allow the user to open or close all panels on a particular page.
|
 |
The fix button is a function of the Data Validation panel that takes the user to the screen where the missing or invalid data is located thereby providing the user the opportunity to correct.
|
 |
The cancel button appears at the bottom of the “Actions” tab for a document that is in progress and should be used with caution. Utilizing the “cancel” button will render the document read-only, thereby preventing the user from making any further updates to the document. When the “cancel” button is selected, the application will display the following message: “Are you sure you want to cancel?” Users can select “yes” or “no”.
There is no ‘undo’ feature for when a user selects “yes”; users can, however, copy cancelled documents.
|
 |
The clear button allows the user to delete any unsaved text entries.
|
 |
The close button appears at the bottom of each page and allows the user to exit the document. Upon clicking the close button, the application will display the following message: “Would you like to save this document before you close it?” Users can select “yes”, “no”, or to return to the document to continue working.
|
 |
The Approve button appears at the bottom of the “Actions” tab once the document has been submitted for approvals. In Proposal Development, the Approve button also appears on the Proposal Summary page. The “Approve” action can be taken after the document has been routed to you to be reviewed. Selecting the Approve button signifies that you find the information satisfactory and agree with the transaction moving forward.
|
 |
The Disapprove button appears at the bottom of the “Actions” tab once the document has been submitted for approvals. In Proposal Development, the Disapprove button also appears on the Proposal Summary page. When selected, this button closes the document record and stops any advancement of the approval process; the document becomes read-only and cannot be edited further nor can the document be submitted to a sponsor. The system will require the user to add a reason so that the rationale for the disapproval is apparent. A good way to remember that the disapprove action is a terminal action is "Disapprove" = "Dead".
|
 |
The FYI button appears at the bottom of the “Actions” tab once the document has been submitted for approvals. An abbreviation of the phrase, “For Your Information”, FYI button is utilized when the document has been routed to a given viewer for informational purposes. Clicking the FYI button signifies that a given viewer has reviewed the information in the document.
|
 |
The reject button appears at the bottom of the “Actions” tab once the document has been submitted for approvals. In Proposal Development the reject button also appears on the Proposal Summary page. Utilizing the “reject” button returns the document to the Initiator and indicates a reviewer has identified changes that are required for approval. The system will require the reviewer to add a reason for selecting the “reject” button so that others are made aware of the rationale for the rejection and corrections that are necessary for approval.
|
 |
The reload button appears at the bottom of each page and allows the user to revert to the most recent save of the document. This is helpful if you have entered information you subsequently decide you do not want to retain but have not yet saved. Note that KC performs an automatic save to the data when you move between tabs within a document.
|
 |
The reset button deletes all unsaved changes made to a document. It reverts to the previously saved document.
|
 |
The save button appears at the bottom of each page and allows the user to retain changes made to a document.
|
 |
The search button engages a database search based on the criteria entered into the search fields. This is used with the Lookup Functionality. |
 |
The submit button sends the document into workflow routing. Once a document is submitted, it remains in ‘ENROUTE’ status until all approvals have taken place. |

